Enabling Aero User Interface
Aero is a very cool and beautiful user interface of Windows 7. To run Aero, you need a PC with specs like 1 GHz CPU, 1 GB system memory and 128MB of video RAM. If your system is low on specs, you won’t be able to use Aero. Here is a workaround for enabling Aero on systems that have low specs.
1. Launch Windows
Registry Editor by typing
Regedit in Start Menu
2. Navigate to
HKEY_CURRENT_USER\Software\Microsoft\Windows\DWM
3. Right-click on the right-hand pane and create the following three DWORD entries and set value for each one:
Animations – set value to 0.
Blur – set value to 0.
UseMachineCheck – set
value to 0.
4. Close the Registry Editor
5. Go to the Start Menu, enter “cmd” and press Enter to open the Command Prompt.
6. Type the following commands:
Net Stop uxsms and then press Enter
Net
Start uxsms and then press Enter
7. The last step is to right-click on your desktop and choose: Personalize/Windows Colors.
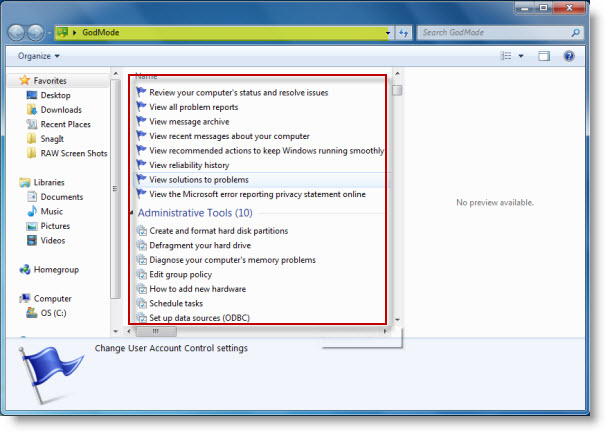
Windows 7 GodMod
The Windows GodMode features lets you view all the control panels in a single folder. All you need to do is create a new folder by the following name:
GodMode.{ED7BA470-8E54-465E-825C-99712043E01C}. After it is done, the icon of
the folder will change to the control panel icon and when you open the folder, you will see all the control panel options inside it.
Fix Taskbar Preview Delay Time
Windows 7 users know that thumbnail preview of taskbar items is a very cool feature. You can view the thumbnail by hovering the mouse over the respective taskbar item. However, you may notice that sometimes, the previews do not appear quickly. Here is a hack to fix the taskbar preview delay time.
1. Launch Windows Registry Editor by typing
regedit in Start Menu
2. Navigate to
HKEY_CURRENT_USER\Software\Microsoft\Windows\CurrentVersion\Explorer\Advanced
3. Right click in the right-hand pane of
Windows Registry and select New -> DWORD Value.
4. You need to name the new DWORD as “
ExtendedUIHoverTime”
5. Double-click on the created DWORD to open it.
6. Select “
Decimal” under “
Base” and enter the delay time (in milliseconds) in the “
Value data” field.
7. Click OK
Putting a New Windows 7 Login Screen
If you do not like the Windows 7 login screen, you can change it by trying this simple hack. Here is how you can do it.
1. Launch the Windows Registry Editor by typing
Regedit in Start Menu
2. Go to
‘HKEY_LOCAL_MACHINE\Software\Microsoft\Windows\CurrentVersion\Authentication\LogonUI\Background‘.
3. Double-click the DWORD value called ‘
OEM Background’ to open it and enter 1 in the Value data field.
Note: If the DWORD ‘
OEM Background’ is not there, you need to make it.
4. Browse to the background image that you would like use on the log-in screen. A JPEG file that is less than 245 kb in size can only be used here.
5. Copy the image you want to use into the ‘
%windir%\system32\oobe\info\backgrounds‘ folder. If the folder is not present, you need to create it.
6. Rename the image to
backgroundDefault.jpg
7. Restart your computer to check the new login background screen.
Enabling Quick Launch
Quick Launch is a place where you can add set of icons that you frequently use. This feature can be found in Windows XP and Windows Vista, however it is not present on Windows 7. You can enable it by doing the following hack:
1. Right click on the taskbar and then select
New Toolbar.
2. You need to put the following location
%userprofile%\AppData\Roaming\Microsoft\Internet Explorer\Quick Launch in the new window that appears.
3. Next, click on ‘
Select Folder’.
4. Quick Launch will appear on the taskbar but will contain text of the respective icon. To hide it, click on the dotted lines and uncheck ‘
Show Title’ and ‘
Show Text’